Viewing entries in
Sculpture

3D Jellyfish (2nd Grade)

3D Jellyfish (2nd Grade)

Name of Project: 3D Jellyfish 

Grade Level or Age of Participant: 2nd Grade 

School, Teacher and Classroom:

MCAD Teaching Artist:  Lydia Egge

Number of Students: 27 students 

Visual Arts Content or Standards

5.2.2.2.2

5.2.2.3.1

5.2.2.3.2

5.2.2.4.1


5.2.3.6.1 (1. Choose artwork based on a theme or concept for an exhibit.)?


5.2.4.7.1

5.2.4.8.2 (maybe)


Curricular Link / Standards

2009 Minnesota Academic Standards in Science 

2.2.1.1.1

2.2.2.1.2


Overview of Project

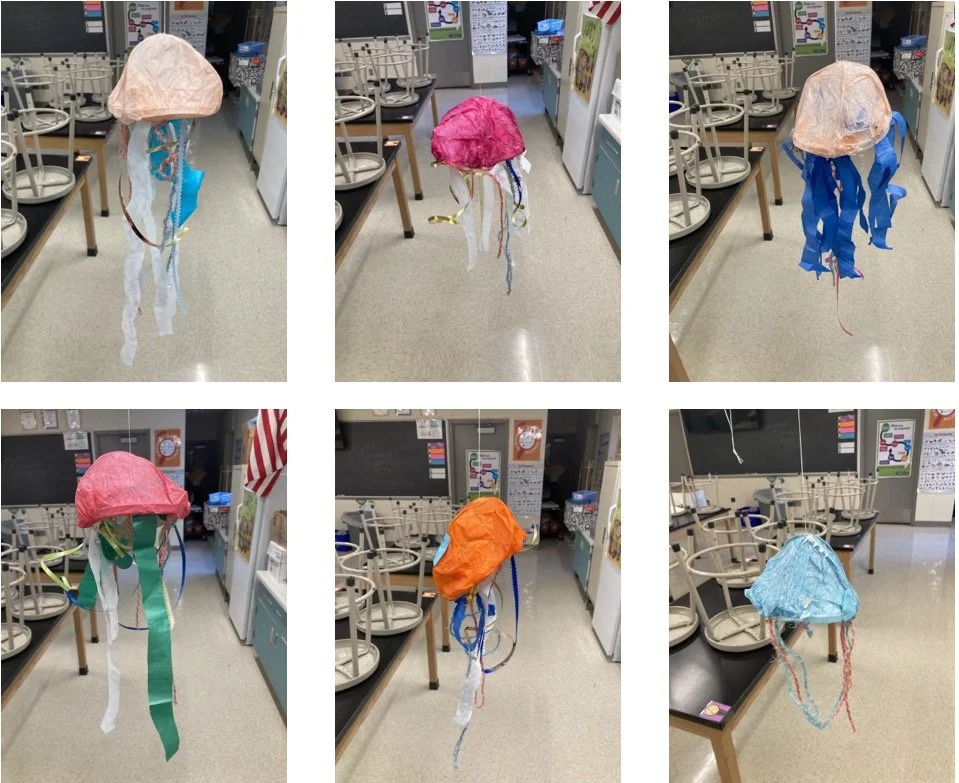
This project will consist of two parts. Part one will be forming the hood of the jellyfish with sculpting metal, tissue paper, and glue. Part 2 will be creating the tentacles using yarn, paper, and ribbon and then attaching the tentacles to the body. 


“Big Ideas”/ Essential QUESTION(s)

What can I do to a material to change its visual properties?

Manipulation of materials. 


Student Outcome Objectives 

Students will:

1. Be able to translate 2d visuals into a 3d representation 

2. Discover through experimentation

3. Visualize or Solve?


Prior Knowledge

No prior knowledge is needed.


Lesson Preparation Timeline

Teaching dates: 1/27/2022 and 2/3/2022

Still planning talking about possible installation dates 


Examples of Artwork

I will bring in examples of what the possible project outcome could be (including one made by a friend of mine that I tested the project on)


Additional Resources

I am planing on showing a video of jellyfish swimming while they work, pictures of real jellyfish, and pictures of jellyfish sculptures. I also am using materials that I have recently been experimenting with on my own. 


Assessment

After the class reflecting on what makes something that’s not moving look like it is or could?

How did certain treatments (like adding water to paper or crumpling up paper) affect a material and how could that affect be useful in translating an idea or visual. 


Materials

Material list:

Ring (deli lids with middle cut out)

Elmers Glue

Sculpting wire

Tissue Paper

Sparkles

Paint brushes 

Plates for glue

Newspaper (for mess)

Blue tape with strings (name tags)

Cardboard box  (carrying everything and potentially ones labeled for each class for drytime)

Water bottle (washing glue paintbrushes)

Paper towels (potential mess)

Yarn

Ribbon

Garbage bags (cut into strips)

Cardstock paper strips (gluing tentacles to this)

Glue sticks (provided by kids..maybe have some extras?)


Kit 1:

Sculpting metal x2

Deli lid x1

Tissue paper squares x2 

Glob of glue on paper plate 

2” Paintbrush 


Kit for Part 2:

Ribbon x2

2 pieces of yarn 

Garbage bag strips x1

Tissue paper strips x1

1” Strip of cardstock paper 


Learning Activities and Timing

Before class starts:

Lay out newspaper, plates with glue, and kits 

  1. Say hello and introduce myself: My name is Lydia and I am currently in school studying furniture design. I work with many different materials including things like: metal, wood, paper, glue, plaster etc and we are going to working with some of those materials today to make jellyfish sculptures.

(remind students to not touch anything yet) 

  1. Open up presentation and introduce the project: We are going to be making 3d jellyfish sculptures

  2. Show some examples of 3d jellyfish sculptures

  3. Talk about the basic Jellyfish parts (the ones we will be making in the sculpture)

Jellyfish parts:

- The hood (or bell) is what encloses the internal structure of the jellyfish

- Tentacles are covered with cells called “cnidocytes” that can stings and kill other animals

- Oral arms are also coated in a venomous cell (nematocysts). The oral arms are closer to the mouth and body of the jellyfish and and are used to draw food up to their mouths

6.  Show photos of real jellyfish 

-What do you notice in the photos? How would you describe them? Ask 2 students to share words. (Repeat for jellyfish sculptures) 

Ask: “How would you describe the differences between the real and fake jellyfish? 

1:20

7. Explain the project briefly (overview)

8. Tutorial 1:

- on bending wire and wrapping it

- applying glue and tissue paper (remind them that this is tricky and if you feel frustrated to take a deep breath and try again or ask for help)

1:25

10. Play video of jellyfish on big screen while the kids work 

11. Walk around and help 

1:35

12. Once ready for step 2 have everyone stop working and listen to Tutorial 2

-show to attach tentacles to cardstock 

-show different techniques for manipulating material

1:40

13. Talk about materials they could find and use at home to add to their jellyfish

14. Final step attaching tentacles  (If we run out of time students who don’t get to the step leave them and I will do it after class)

1:55

15. Reflect:

Share one choice you made for your 3D jellyfish. (did you crumple the tissue paper? Did cut things short or keep them long? Did you use all of your materials or only a few?)

Yayoi Kusama Paper Sculpture Flowers

Yayoi Kusama Paper Sculpture Flowers

Name of Project: Yayoi Kusama Paper Sculpture Flowers

Grade Level or Age of Participant: Ages 5-11

School, Teacher and Classroom: Minneapolis Institute of Arts, Family Day - May 8th, Supervisor - Victoria Myers

MCAD Teaching Artist: Natalie Vilter 

Number of Students: ~400


VISUAL ARTS CONTENT OR STANDARDS

 5.1.2.3.1 Visual Arts 

Grade 1: Create original artistic work 

1. Identify and use symbols when creating art

5.1.2.3.2 Visual Arts 

Grade 1: Create original artistic work 

2. Practice safe use of art materials and tools while making art


OVERVIEW OF PROJECT

Students will create their own flower paper sculptures inspired by Yayoi Kusama’s flower sculptures. Students will also use various techniques to make paper into a three dimensional form.


“BIG IDEAS”/ ESSENTIAL QUESTION(S)

How can one use paper, a 2-dimensional object, to create a 3-dimensional sculpture using a series of techniques?

What do you think are important features of a flower and what shapes do these features take in your mind?

STUDENT OUTCOME OBJECTIVES

Students will:

  • Recall the contemporary artist, Yayoi Kusama, and her art practice

  • Compare Yayoi Kusama’s flowers to their own idea of a flower and visualize important features of a flower

  • Construct their own three dimensional flower using paper

  • Explore various techniques to give their flower texture and stand


PRIOR KNOWLEDGE

  • Know basic features of a flower

  • Using a glue stick and scissors

LESSON PREPARATION TIMELINE

  1. Create art example

  2. Write out a lesson plan and short bio about Yayoi Kusama’s work

  3. Create a visual of various techniques to use for a paper sculpture (example shown below)

Visual of Paper Techniques

  1. Meeting with Victoria Myers about revisions to lesson plan

  2. Revisions to lesson plan

  3. Ordering materials

  4. Cut stips of colored paper that are a variety of 0.5 and 1 inch thick

  5. May 8th - Set up for the event 

  6. May 8th - teach for the event

  7. May 8th - take down the event and put away extra supplies


EXAMPLES OF ARTWORK

Paper Sculpture Example

Up Close Example


ADDITIONAL RESOURCES

Yayoi Kusama, Flowers that Bloom Tomorrow (L), FRP, metal, and urethane paint, 2010

https://www.victoria-miro.com/artists/31-yayoi-kusama/works/artworks13475/

Yayoi Kusama, Flowers that Bloom Tomorrow (L), FRP, metal, and urethane paint, 2010

https://www.victoria-miro.com/exhibitions/411/works/96bbb645b1a41a/

ASSESSMENT

The outcome will be successful if the students are able to use basic shapes to create a flower, real or imaginary. Students will see their own success, if they were able to make their flower three-dimensional using various paper sculpture techniques. 


MATERIALS

  • 8” x 6.5” brown paper bag

  • Scissors

  • Ruler

  • Pencil

  • Eraser

  • Pencil sharpener

  • Gluestick

  • Hole Puncher

  • Assorted colors of construction paper that are 0.5” to 1” thick

  • A table for participants to work on

  • Stapler and staples 

LEARNING ACTIVITIES AND TIMING

  1.  Greet incoming participants and ask if they would like to create a paper flower sculpture (5 minutes)

    1. Explain it’s inspired by Yayoi Kusama’s flower sculptures

      1. Explain that Yayoi Kusama is a Japanese contemporary artist who creates a variety of artwork from performances, sculptures, installations, and paintings. She’s known for coating her artwork in polka dots, which has given her the nickname, “The Princess of Polka Dots”. 

      2. Point out the abstract form, but still has features that make it identifiable as a flower

      3. Point out the curves and polka dots on the flowers 

  2.  Give participants a paper bag and scissors. Participants will disassemble the paper bag by removing the entirety of the twine and cutting a slit vertically down the bag until they reach the bottom of the bag. Students will then cut off the entire bottom part of the bag. Students will then unfold the bag, so it becomes one long strip (7 minutes)

  3. Students will then take the long strip and fold it cleanly in half. Then using a glue stick, students unfold the bag, coat the bag in glue and refold the bag. Participants will push down on the bag to make sure the sides stick together. (3 minutes)

    1. NOTE: recommend that they coat the edges of the bag in glue and create a large “X” in the center of the bag with glue

    2. This will be the base for their flower sculpture. 

  4. Pull out a visual of the various techniques students can use for their paper sculpture. (1 minute)

  5. Ask participants what makes a flower identifiable as a flower (1 minute)

  6. Hand out various colors of paper, gluesticks, and scissors for participants to start assembling their flowers. (1 minute)

  7. Students will begin to assemble their flowers. TA will offer guidance when the participant asks. (17 minutes)

  8. Offer hole punch and foam stickers to decorate the base and flower. (5 minutes)


TEACHING ARTIST REFLECTION

  • Depending on the age of the participants, they might have difficulty disassembling the bag with no tears. The teacher and volunteers will be there to help disassemble the bag. 

  • Participants might have difficulty using the glue stick and patiently holding down objects so they stick. Staplers will be provided just in case. 

  • Family Day at the MIA is a public event, so others will be able to see their finished product as they walk through the MIA. 

  • The teacher will receive feedback based on participants' enthusiasm for the project.